Tuesday 12 February 2013

Change Font type, Style, Size and Color in TextView

Changing the Font type, Style, Size in Textview can be done via both xml and Java code..
Here i will show both methods.


main.xml:
<RelativeLayout xmlns:android="http://schemas.android.com/apk/res/android"
    xmlns:tools="http://schemas.android.com/tools"
    android:layout_width="match_parent"
    android:layout_height="match_parent"
    tools:context=".ChangeTextViewPropertity" >

    <TextView
        android:id="@+id/textView1"
        android:layout_width="wrap_content"
        android:layout_height="wrap_content"
        android:layout_alignParentLeft="true"
        android:layout_alignParentTop="true"
        android:layout_marginLeft="24dp"
        android:layout_marginTop="38dp"
        android:text="Text From XML"
        android:textSize="40dp"
        android:textStyle="bold"
        android:typeface="serif"
        android:textColor="#0000CD"
        
         />

    <TextView
        android:id="@+id/textView2"
        android:layout_width="wrap_content"
        android:layout_height="wrap_content"
        android:layout_alignLeft="@+id/textView1"
        android:layout_below="@+id/textView1"
        android:layout_marginTop="158dp"
        android:text="TextView" />

</RelativeLayout>


ChangeTextViewPropertity.java:
package com.example.font;

import android.os.Bundle;
import android.app.Activity;
import android.graphics.Color;
import android.graphics.Typeface;
import android.view.Menu;
import android.widget.TextView;

public class ChangeTextViewPropertity extends Activity {
 TextView tv;
    @Override
    protected void onCreate(Bundle savedInstanceState) {
        super.onCreate(savedInstanceState);
        setContentView(R.layout.main);
        tv=(TextView)findViewById(R.id.textView2);
        tv.setText("Text From Java Code");
        tv.setTypeface(Typeface.SANS_SERIF);
        tv.setTextSize(50);
        tv.setTextColor(Color.RED);
               
    }   
}


Thanks for Visiting
 -- 
Regards with

R. Partha Sarathy

Print the Text using TextView

Purpose of TextView:
                                 Normally TextView is used to display some static message. Its Similarly like Label in Java  TextView is like notice board. we can display our message to user via TextView.


We can print text from XML or Java Code. Here we are going to see both methods..
This example is based on GingerBread Version.


main.xml:
<RelativeLayout xmlns:android="http://schemas.android.com/apk/res/android"
    xmlns:tools="http://schemas.android.com/tools"
    android:layout_width="match_parent"
    android:layout_height="match_parent"
    tools:context=".TextViewExample" >

    <TextView
        android:id="@+id/textView1"
        android:layout_width="wrap_content"
        android:layout_height="wrap_content"
        android:layout_alignParentTop="true"
        android:layout_centerHorizontal="true"
        android:layout_marginTop="38dp"
        android:text="This Text From XML"
        android:textAppearance="?android:attr/textAppearanceLarge" />

    <TextView
        android:id="@+id/textView2"
        android:layout_width="wrap_content"
        android:layout_height="wrap_content"
        android:layout_alignLeft="@+id/textView1"
        android:layout_below="@+id/textView1"
        android:layout_marginTop="40dp"
        android:text="Large Text"
        android:textAppearance="?android:attr/textAppearanceLarge" />

</RelativeLayout>


TextViewExample.java:


package com.example.textviewexample;

import android.os.Bundle;
import android.app.Activity;
import android.view.Menu;
import android.widget.TextView;

public class TextViewExample extends Activity {
 TextView tv;

    @Override
    protected void onCreate(Bundle savedInstanceState) {
        super.onCreate(savedInstanceState);
        setContentView(R.layout.main);
        tv=(TextView)findViewById(R.id.textView2);
        tv.setText("This Text From Java Code");
        
    }
   
}


Thanks for Visiting
 --
Regards with

R. Partha Sarathy

Saturday 9 February 2013

Sample Hello World Program in Android or Writing our First Program in Android

Hai Friends Now we are going to write our first program for Android OS.
If you don't have Android Development Environment.. Refer here how to set up Android Development Environment.

Step 1:
Open Eclipse IDE..


Step 2:
Select
File ->New ->Android Application Project


Step 3:
Give Project Name and Application Name as "HelloWorld"

Step 4:
If You want to change project location you can use here otherwise skip this step and press Next Button

Step 5:
If You want to change you application icon. Here you can change the icon.

Step 6:
If you want to change Activity. here you can change the Activity. In our Helloworld program The Blank Activity is Enough.

Step 7:
Here You can assign name for Activity class and xml file.
Give "HelloWorld" as Activity Name
and
Give "main" as Layout Name

Step 8:
Click finish Button..
Now You Project has created...

Step 9:
In Src Folder you can find Activity class name..
here only you will write your java code for our application.

Step 10:
In Layout Folder you can find xml file for our application.
here only you will write your xml code for our application Appearance.

Step 11:
In Our HelloWorld Program we no need to write any coding...
we just simple run the project...
Right click project and Select Run as and choose Android Application

Step 12:
Now Our output is displayed in Emulator..


Thanks for Visiting
 --
Regards with

R. Partha Sarathy


Updated New Complete Procedure for Android Installation

Hai Friends now i am going to show how we can Setting up environment for Android Application Development.
Its just four step Process.

Step 1:
We need to download Android SDK..
(Refer here for how to install Android SDK)

Step 2:
Install Android Eclipse Plugin into Eclipse IDE.
(Refer here for how to install plugin for Eclipse)

Step 3:
Configure SDK with Eclipse..
(Refer here for how to configure SDK with Eclipse)

Step 4:
Create Android Virtual Device for Development.
(Refer here for How to create AVD)

Thats all ....
Now you have configured Environment for Android..


Thanks for Visiting
 -- 
Regards with

R. Partha Sarathy 

Create AVD for Android Application Development

Step 1:
Open Eclipse IDE..
Click Android Virtual Device Manager


Step 2:
Now will display AVD Manager


Step 3:
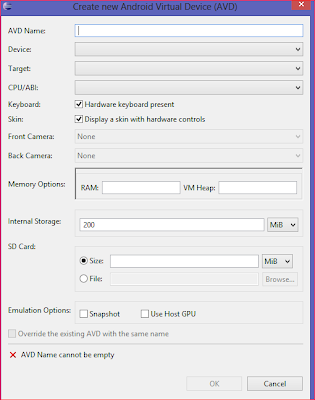
Click New Button


Step 4:
Give AVD Name
Select any device type
Select your target for Application Development
Select CPU/ABI any one
Click OK button...


Step 5:
Select Device and Click Start Button...


Now your emulator will be started..


Thanks for Visiting
 -- 
Regards with

R. Partha Sarathy


Configure Eclipse with Android SDK for Android Application Development

Step 1:
Open Eclipse IDE..
Select
Window -> Preferences


Step 2:
Click Android Tab in left side


Step 3:
Browse Android SDK location and Give Finish..


Now Your Eclipse is Configured with Android SDK..


Thanks for Visiting
 --
Regards with

R. Partha Sarathy


Friday 8 February 2013

Setting Up Eclipse for Android Application Development

Hai Friends Now we are going to discuss about how we can configure eclipse IDE for Android Application Development

Step 1:
First of all we need Eclipse IDE for Development (download from here)

Step 2:
Open Eclipse IDE and Choose Workspace for Android Development.

Step 3:

In Eclipse Select
Help -> Install New Software


Step 4:
Click "ADD"

and Give any of the name for Name field
and Give following url into Location field

https://dl-ssl.google.com/android/eclipse/


Step 5:
Press Ok and Install plugin..
After installing it will ask for restart our application.


Thanks for Visiting
 --
Regards with

R. Partha Sarathy


Setting Up Android SDK for Android Application Development

Hai Friends now we are going to see how we can configure Android SDK for Android.

Step 1:

First of all we should download Android SDK from Developers Site (Click Here to Download)


Step 2:

Install that Software into our Computer


Step 3:
After Installing Open SDK Manager..


Step 4:
Select 2.3 GingerBread Version....


Step 5:
Install GingerBread Version