Tuesday 12 February 2013

Change Font type, Style, Size and Color in TextView

Changing the Font type, Style, Size in Textview can be done via both xml and Java code..
Here i will show both methods.


main.xml:
<RelativeLayout xmlns:android="http://schemas.android.com/apk/res/android"
    xmlns:tools="http://schemas.android.com/tools"
    android:layout_width="match_parent"
    android:layout_height="match_parent"
    tools:context=".ChangeTextViewPropertity" >

    <TextView
        android:id="@+id/textView1"
        android:layout_width="wrap_content"
        android:layout_height="wrap_content"
        android:layout_alignParentLeft="true"
        android:layout_alignParentTop="true"
        android:layout_marginLeft="24dp"
        android:layout_marginTop="38dp"
        android:text="Text From XML"
        android:textSize="40dp"
        android:textStyle="bold"
        android:typeface="serif"
        android:textColor="#0000CD"
        
         />

    <TextView
        android:id="@+id/textView2"
        android:layout_width="wrap_content"
        android:layout_height="wrap_content"
        android:layout_alignLeft="@+id/textView1"
        android:layout_below="@+id/textView1"
        android:layout_marginTop="158dp"
        android:text="TextView" />

</RelativeLayout>


ChangeTextViewPropertity.java:
package com.example.font;

import android.os.Bundle;
import android.app.Activity;
import android.graphics.Color;
import android.graphics.Typeface;
import android.view.Menu;
import android.widget.TextView;

public class ChangeTextViewPropertity extends Activity {
 TextView tv;
    @Override
    protected void onCreate(Bundle savedInstanceState) {
        super.onCreate(savedInstanceState);
        setContentView(R.layout.main);
        tv=(TextView)findViewById(R.id.textView2);
        tv.setText("Text From Java Code");
        tv.setTypeface(Typeface.SANS_SERIF);
        tv.setTextSize(50);
        tv.setTextColor(Color.RED);
               
    }   
}


Thanks for Visiting
 -- 
Regards with

R. Partha Sarathy

Print the Text using TextView

Purpose of TextView:
                                 Normally TextView is used to display some static message. Its Similarly like Label in Java  TextView is like notice board. we can display our message to user via TextView.


We can print text from XML or Java Code. Here we are going to see both methods..
This example is based on GingerBread Version.


main.xml:
<RelativeLayout xmlns:android="http://schemas.android.com/apk/res/android"
    xmlns:tools="http://schemas.android.com/tools"
    android:layout_width="match_parent"
    android:layout_height="match_parent"
    tools:context=".TextViewExample" >

    <TextView
        android:id="@+id/textView1"
        android:layout_width="wrap_content"
        android:layout_height="wrap_content"
        android:layout_alignParentTop="true"
        android:layout_centerHorizontal="true"
        android:layout_marginTop="38dp"
        android:text="This Text From XML"
        android:textAppearance="?android:attr/textAppearanceLarge" />

    <TextView
        android:id="@+id/textView2"
        android:layout_width="wrap_content"
        android:layout_height="wrap_content"
        android:layout_alignLeft="@+id/textView1"
        android:layout_below="@+id/textView1"
        android:layout_marginTop="40dp"
        android:text="Large Text"
        android:textAppearance="?android:attr/textAppearanceLarge" />

</RelativeLayout>


TextViewExample.java:


package com.example.textviewexample;

import android.os.Bundle;
import android.app.Activity;
import android.view.Menu;
import android.widget.TextView;

public class TextViewExample extends Activity {
 TextView tv;

    @Override
    protected void onCreate(Bundle savedInstanceState) {
        super.onCreate(savedInstanceState);
        setContentView(R.layout.main);
        tv=(TextView)findViewById(R.id.textView2);
        tv.setText("This Text From Java Code");
        
    }
   
}


Thanks for Visiting
 --
Regards with

R. Partha Sarathy

Saturday 9 February 2013

Sample Hello World Program in Android or Writing our First Program in Android

Hai Friends Now we are going to write our first program for Android OS.
If you don't have Android Development Environment.. Refer here how to set up Android Development Environment.

Step 1:
Open Eclipse IDE..


Step 2:
Select
File ->New ->Android Application Project


Step 3:
Give Project Name and Application Name as "HelloWorld"

Step 4:
If You want to change project location you can use here otherwise skip this step and press Next Button

Step 5:
If You want to change you application icon. Here you can change the icon.

Step 6:
If you want to change Activity. here you can change the Activity. In our Helloworld program The Blank Activity is Enough.

Step 7:
Here You can assign name for Activity class and xml file.
Give "HelloWorld" as Activity Name
and
Give "main" as Layout Name

Step 8:
Click finish Button..
Now You Project has created...

Step 9:
In Src Folder you can find Activity class name..
here only you will write your java code for our application.

Step 10:
In Layout Folder you can find xml file for our application.
here only you will write your xml code for our application Appearance.

Step 11:
In Our HelloWorld Program we no need to write any coding...
we just simple run the project...
Right click project and Select Run as and choose Android Application

Step 12:
Now Our output is displayed in Emulator..


Thanks for Visiting
 --
Regards with

R. Partha Sarathy


Updated New Complete Procedure for Android Installation

Hai Friends now i am going to show how we can Setting up environment for Android Application Development.
Its just four step Process.

Step 1:
We need to download Android SDK..
(Refer here for how to install Android SDK)

Step 2:
Install Android Eclipse Plugin into Eclipse IDE.
(Refer here for how to install plugin for Eclipse)

Step 3:
Configure SDK with Eclipse..
(Refer here for how to configure SDK with Eclipse)

Step 4:
Create Android Virtual Device for Development.
(Refer here for How to create AVD)

Thats all ....
Now you have configured Environment for Android..


Thanks for Visiting
 -- 
Regards with

R. Partha Sarathy 

Create AVD for Android Application Development

Step 1:
Open Eclipse IDE..
Click Android Virtual Device Manager


Step 2:
Now will display AVD Manager


Step 3:
Click New Button


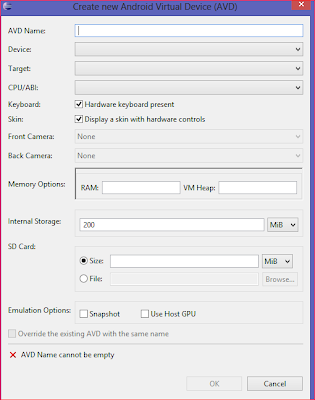
Step 4:
Give AVD Name
Select any device type
Select your target for Application Development
Select CPU/ABI any one
Click OK button...


Step 5:
Select Device and Click Start Button...


Now your emulator will be started..


Thanks for Visiting
 -- 
Regards with

R. Partha Sarathy


Configure Eclipse with Android SDK for Android Application Development

Step 1:
Open Eclipse IDE..
Select
Window -> Preferences


Step 2:
Click Android Tab in left side


Step 3:
Browse Android SDK location and Give Finish..


Now Your Eclipse is Configured with Android SDK..


Thanks for Visiting
 --
Regards with

R. Partha Sarathy


Friday 8 February 2013

Setting Up Eclipse for Android Application Development

Hai Friends Now we are going to discuss about how we can configure eclipse IDE for Android Application Development

Step 1:
First of all we need Eclipse IDE for Development (download from here)

Step 2:
Open Eclipse IDE and Choose Workspace for Android Development.

Step 3:

In Eclipse Select
Help -> Install New Software


Step 4:
Click "ADD"

and Give any of the name for Name field
and Give following url into Location field

https://dl-ssl.google.com/android/eclipse/


Step 5:
Press Ok and Install plugin..
After installing it will ask for restart our application.


Thanks for Visiting
 --
Regards with

R. Partha Sarathy


Setting Up Android SDK for Android Application Development

Hai Friends now we are going to see how we can configure Android SDK for Android.

Step 1:

First of all we should download Android SDK from Developers Site (Click Here to Download)


Step 2:

Install that Software into our Computer


Step 3:
After Installing Open SDK Manager..


Step 4:
Select 2.3 GingerBread Version....


Step 5:
Install GingerBread Version

Monday 28 January 2013

Android Life Cycle Methods

Hai Friends Now we are going to discuss about some Android Life Cycle Methods.

The Android Life Cycle Methods are
  • onCreate()
  • onRestart()
  • onStart()
  • onResume();
  • onPause()
  • onStop()
  • onDestroy()
  • onSaveInstanceState()
Not we are going to discuss here for all methods.

onSaveInstanceState():

It called if the activity is stopped. it used to save data.
it can restore it states if it restarted.

onPause():

It always called if the activity ends, can be used to release or save data.

onResume()

Called if the activity is re-started.
it can be used to initialize fields.


Thanks for Visiting
 --
Regards with

R. Partha Sarathy

About Dalvik Virtual Machine


  • Its Simlarly like Java's JVM(Java Virtual Machine)
  • DVM have own bytecode format


Thanks for Visiting
 -- 
Regards with

R. Partha Sarathy

Android Application Architecure

Hai friends now we are going to see Android Application Architecture.


AndroidManifest.xml:
                                The Components and Settings of android application are described in this xml file.
This is also contains required permissions.

R.java & Resources:

  • It Genertes reference class
  • its under "gen" folder
  • That resource must be defined under "res" folder. like image etc..
  • if we create new resource its automatically generated in R.java file.
Assests:
  • Its Structured Value.
  • Its used to store any type of data.
  • we can access this via AssetsManager
Activities & Layouts:
  • The activity is defined via Layout
  • The Activity include widgets
  • The layout can be declared via xml or java code. (mostly we use xml)
  • It Specified at res/layout folder(main.xml)
  • we can use View id


Thanks for Visiting
 --
Regards with

R. Partha Sarathy


Overview of Android Programming Development Process

Hai friends now i am going to share about Android Development Process.
I think below image will explain the process.


  • Android programming is written by Java code. the Java source code converted into .class file by using Java Compiler.
  • Android Provides tool "dx". It converts Java class file into dex
  • All class files are converted and compressed into one application. which is in dex format.
  • During conversion of .dex the reduent information has been optimized.
  • So its very smaller then smaller.
  • The dex file and resource of android packed into .apk(Android Package) format.
  • This process done by AAPT(Android Asset Package Tool)
  • The .apk file contain all detail. This run by ABT(Android Bridge Tool)

Thanks for Visiting
 -- 
Regards with

R. Partha Sarathy


What is Android Development Tools (ADT)

Hai friends now we will might discuss about Android Development Tools


  • It provides ADT plugins together work with Eclipse IDE
  • ADT Contains all required funtions such as create, compile, Debug & Deploy.
  • Its Provides Emulator.
  • The Emulator used to test our application without real device..


Thanks for Visiting
 -- 
Regards with

R. Partha Sarathy


Android Components

Hai friends now we are going to discuss about List of Android Components.


  1. Activity
  2. Views & View Groups
  3. Intents
  4. Services
  5. Content Provider
  6. Broadcast Receiver
  7. Widgets (Home Screen)
  8. Others

Activity :
  • Its Presentation Layer
  • Its Simply defined as front Screen.
  • It Can Display Dialog
  • it may have several Activities.
Views & View Groups :
  • Views are User interface Widgets
  • Base Class android.View.view.views
View Group:
  • Its used to arrange Views.
  • Its Layout Manager
Intent:
  • Its used to get Some functionality from other applications
  • Application has to register them self intents via IntentFilter
Services:
  • Its Perform background task without provide user interface
Content Provider:
  • Its Structure Interface to application data.
  • The user can share data with other applications.
  • SQLite database uses Content Provider.
Broadcast Receiver:
  • Its used to receive System messages & Intents
Widgets:
  • Widgets are Interactive components.
  • Its display some data the user perform some task via that. for example Email Reading
Others:
 Live Folder and Live Wall Papers.


 Thanks for Visiting...
 -- 
Regards with

R. Partha Sarathy

Android Security and Permissions

Hai Android Coders now i am going to share about Security Features of Android

  • During Deployment on Android Application. it will create unique Id and User for Android Application.
  • Other Android Applications cannot access these files.
  • Normally Android application starts with it own process.
  • If data to be share the application must do via Service or Content Provider.
  • It have Permission System.
  • It have some predefined permission but we have to define some additional permission for our application.
  • These permissions have different levels. Some Permissions granted by android System. like Internet State permission. Some Permission may granted by User like internet Access permission.
  • The User may reject user permission.
  • In Most cases the requested permission will be present before install Application. The User will decide about permission.


Thanks For Visiting...

 --
Regards with

R. Partha Sarathy

What is Google Play or Android Market

A brief Notes about Google Play :


  • Its an Application. Its used to install android application into mobile.
  • All Android Mobiles having Google Play Service. 
  • Its also notify updates for already existed applications.
Thanks for Visiting
 -- 
Regards with

R. Partha Sarathy

Advantages and Disadvantages of Android

Hai friends Now i am going to share about advantages and disadvantages of Android. 

Advantages :

  • Allows Background Processing
  • Provides Rich User Interface
  • Supports 2D & 3D Graphics
  • Access the File System
  • Using SQLite Database
  • It Can reuse already existed Applications

Disadvantages:

  • It will not support for .avi and .gif format files
  • It takes only Java Syntax but provide own library files.

Difference Between Apple IOS and Android

Hai Friends here i am going to share the difference between Apple IOS and Android..
The IOS is a Competitor of Android.


Thanks for Visiting
 -- 
Regards with

R. Partha Sarathy

Sunday 27 January 2013

List Of Android OS Versions

Hai Friends Here i am going to share about versions of Android.


About Android

Its Mobile Operating System based on Linux OS and Java Programming.

Android OS:
                  Its not only Operating System. it includes many extra features..

Android Programming: 
                                Android Programming inherits the concepts from Java Programming. So Java Programmers easily can develop android apps. Android Program also have own separate concepts.

Android SDK- Android Software Development Kit:
                       It Provides all necessary tools to develop android application such as Compiler, Debugger, Device Emulator and have own Virtual Machine (DVM- Dalvik Virtual Machine).


Thanks for Visiting
 -- 
Regards with

R. Partha Sarathy
History of Android

A brief History of Android:

Actually Android is small software company. they developed mobile oriented applications for their clients. In 2005 the Google bought Android Company for such amount. They Formed OHA (Open Handset Alliance) for Android OS Development. 

There are 34 members for OHA. Members like Motorola  Sony Ericsson  t-mobile etc. .Finally Google released First android G-mobile in 2008.


Thanks for Visiting
 -- 
Regards with

R. Partha Sarathy